How to Use Screen Tension Meter: Unlock Precision, Consistency, and Print Quality
How to use screen tension meter isn't just a how-to—it’s a discipline. It’s the heartbeat of every crisp detail, every precise layer, every repeatable job. Tension isn’t optional; it’s foundational. Learn it, use it, and watch your prints el
If precision, repeatability, and quality matter to your screen printing, mastering how to use screen tension meter is a game-changer. It’s not merely shop talk—it’s how pro shops stay sharp from start to finish.
Why Even Tension Makes or Breaks Your Print
When your mesh is under the right tension, each stroke of the squeegee translates into crisp, detail-filled prints. Loose mesh yields smudged, soft designs. Too tight? It risks mesh distortion or damage. Knowing how to use screen tension meter let’s you control this balance precisely, so prints consistently sing with clarity and layers stay registered.
The Role of the Screen Tension Meter
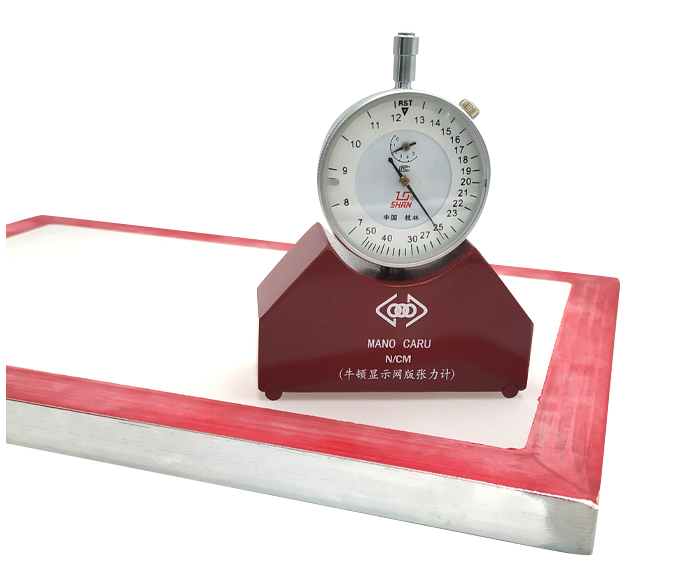
A standard screen tension meter reads tension in Newtons per centimeter (N/cm). To use it effectively:
-
Place the meter on the mesh—usually at the center.
-
Tap the top gently—this overcomes mechanical friction and boosts consistency abqindustrial.net.
-
Read the value directly from the display or dial.
-
Rotate the screen 90° to measure both warp and weft tension, ensuring uniform stretch across directions printphase.com.
That’s your tension realized—not guessed.
Step-by-Step: Mastering “How to Use Screen Tension Meter”
Step 1: Prepare the Screen
Ensure mesh is clean and dry. Eliminating residue helps accuracy and repeatability.
Step 2: Position the Meter Mid-Screen
Start in the center of the print side. That gives you the most relevant baseline tension printphase.com.
Step 3: Light Tapping Technique
A few pulses to the mesh help settle the meter’s mechanism—essential for dependable readings abqindustrial.net.
Step 4: Apply Even, Gentle Pressure
Hold the meter squarely, not tilted, and let its weight activate the sensor evenly.
Step 5: Rotate and Repeat
Spin the screen to measure across both axes. Consistency here means better print control.
Step 6: Interpret the Reading
Target around 25–35 N/cm for most mesh counts—but adjust based on your mesh type or fabric demands First Trim.
Step 7: Adjust Tension If Needed
Too loose? Retension or re-stretch. Too tight? Slightly relax. Aim for consistency over power.
Step 8: Repeat Over Time
Tension drops with use. Measure routinely to maintain stability in every run.
How to Use Screen Tension Meter with Confidence
-
Repeatability: Tapping and careful placement ensure you get similar readings screen after screen.
-
Balanced Measurement: Measuring both directions avoids warping prints due to uneven tension.
-
Performance Flags: If prints shift or misregister, odds are tension is off—and your tension meter is your first detective.
Real Shop Benefits: What Pros Notice
One printing veteran shared that nearly all registration and blurring issues disappeared once they mastered how to use screen tension meter. Another emphasized how consistent tension creates a predictable exposure profile, leading to saved materials and faster setups. These aren’t cosmetic—it’s real, quality control made visible.
Selecting the Right Tension Meter
When shopping, keep in mind:
-
Accuracy: ±1 N/cm or better.
-
Ease: Digital or dial readouts.
-
Durability: Solid housing resists shop wear.
-
Maintenance: Tapping technique helps avoid friction-induced drift.
Final Thoughts
How to use screen tension meter isn't just a how-to—it’s a discipline. It’s the heartbeat of every crisp detail, every precise layer, every repeatable job. Tension isn’t optional; it’s foundational. Learn it, use it, and watch your prints elevate.
Tags: 0.1 micron filter bag 0.5 micron filter bag 1 micron filter bag 50 micron filter bag 25 micron filter bag 10 micron filter bag 1000 micron filter bag 5 micron filter bag micron filter bag micron filter bags 25 micron filter bags 100 micron filter bag 180 micron filter bag 250 micron filter bag 200 micron filter bag 200 micron filter bags 100 micron filter bags 1 micron filter bags micron filter bags near me 05 micron filter bag 30 micron filter bag 150 micron filter bag 10 micron filter bags 200 micron filter bag wholesale 0.1 micron filter bag wholesale 500 micron filter bag 400 micron filter bag 50 micron filter bag wholesale 400 micron filter bag wholesale 20 micron filter bag 0.1 micron filter bag factory in china 500 micron filter bag factory in china 20 micron filter bag wholesale 5 micron filter bag wholesale 250 micron filter bag factory in china 150 micron filter bag wholesale in china micron filter bag wholesale in china 190 micron filter bag 400 micron filter bag factory in china
Tension Meter Screen Tension Meter
Next:Screen Tension Meter Price: Making Sense of Your Investment for Professional Printing
Tags:
