Find the Right Tension Meter for Screen Printing — make every print predictable
If you want consistent, repeatable screen printing results, the single-most effective quality control tool is a reliable tension meter for screen printing . Whether you run a one-operator studio or a multi-press production floor, measuring and controlIf you want consistent, repeatable screen printing results, the single-most effective quality control tool is a reliable tension meter for screen printing. Whether you run a one-operator studio or a multi-press production floor, measuring and controlling mesh tension removes guesswork, improves registration, reduces ghosting and preserves halftone fidelity. A short investment in the right meter saves hours of setup time and prevents ruined runs.
Why mesh tension matters more than you think
Mesh tension controls how the screen snaps off the substrate, how ink shears through the mesh, and how consistent every print looks from the first pull to the last. Under-tensioned screens tend to drag and smear; over-tensioned screens can warp or fail. A precision tension meter for screen printing gives you a numeric, repeatable measurement so you can set targets for each mesh count and verify that your stretcher or pre-stretched screens meet those targets before exposure. Trusted industry guides show simple target ranges and recommend measuring in both mesh directions for evenness.
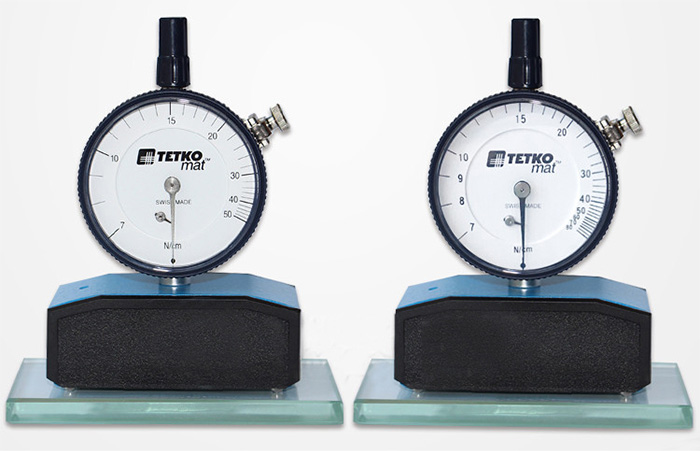
Types of meters — mechanical, digital and handheld analog gauges
There are three practical families of tension meter for screen printing you'll encounter:
-
Mechanical dial meters — rugged, no battery, and familiar to many shops; they often include a calibration standard and read in N/cm or Newtons, delivering quick, reliable readings on the fly.
-
Digital meters — provide a numeric readout, memory for multiple points, and sometimes simple logging; useful for shops that want traceable records.
-
Economy handheld gauges — lower-cost options that are fine for spot checks or hobbyists, though batch-to-batch accuracy can vary; validate them with a known standard if you intend to rely on the numbers.
Choose the family that matches your workflow: rugged mechanical units for heavy-shop use, digital units if you need documentation and trend tracking, and economy handhelds for occasional checks.
What to look for on a spec sheet — measurement range, units and calibration
When evaluating a tension meter for screen printing, the data you read at a glance should include: measurement range (e.g., 7–50 N/cm or 0–130 N/cm), stated accuracy or tolerance, calibration certificate included (or available), and the measurement units (N/cm is standard in screen printing). Meters that publish these specs reduce the back-and-forth with procurement and increase buyer confidence. Some manufacturers will include the first calibration as part of the purchase — a small but valuable trust signal.
How to measure — a practical 5-point routine you can use now
A repeatable measurement routine prevents random readings and gives you a baseline to control process drift. Use this simple protocol with any tension meter for screen printing:
-
Pick measurement points — choose center plus four more (or the common 9-point grid) to sample warp and weft evenly. Murakami - Screen Printing Emulsion+More
-
Zero or calibrate — place the meter on the supplied zero standard and confirm it reads zero before starting. Shur-loc®
-
Measure both directions — rotate the meter 90° to read the other mesh direction; tension should be within a small band (often 1–2 N) across checked points. ScreenPrinting.com
-
Record and compare to target — log the numbers for future trending and for acceptance testing.
-
Act on the results — if readings are low, re-stretch or adjust; if high, relieve tension to safe levels.
These steps are simple to teach operators and quickly cut down on printing problems.
Recommended target tensions by mesh type — practical guidance
While target tension depends on mesh count, weave and manufacturer guidance, typical ranges frequently used on production floors are a good starting point. Aim for consistent numbers across a set of screens rather than chasing an absolute single value—consistency matters more than raw tightness. Industry references and testing tools map target ranges by mesh; use your meter to validate each new screen or purchased pre-stretched panel.
Choosing between a mechanical and a digital meter — pros and cons
A mechanical tension meter for screen printing is simple, durable and often tolerates rough shop conditions. It’s the workhorse choice for many production environments. A digital meter adds precision, easier reading, and sometimes data logging — useful for labs, quality control, or shops that must document results for clients. If traceability and batch records matter, the digital path pays back in fewer disputes and faster troubleshooting.
Procurement checklist — ask suppliers for these deliverables
To avoid surprises when buying a tension meter for screen printing, include these items in your RFQ:
-
Measurement range and units (N/cm preferred).
-
Stated accuracy/tolerance and calibration certificate (first calibration included is a plus).
-
Ruggedness features (case, jeweled movement, dust protection).
-
Replacement parts and calibration service availability.
-
Quick-start guide or on-site training options.
Vendors who proactively list these reduce procurement friction and help you standardize measurement across shifts.
Calibration and traceability — keep your readings credible
Calibration is not a one-time checkbox — it’s part of a measurement program. Good tension meter for screen printing providers include an initial calibration and offer periodic recalibration. If you must show traceability to a quality system or a customer, choose a meter and supplier that provide dated calibration certificates and a simple recalibration process. This practice preserves the value of the numeric readings and avoids costly disputes about "inaccurate tension" causing print defects.
Training your team — 10-minute daily routine that prevents problems
Teach press operators a fast daily check: before the first run, rotate the meter to a central point, measure warp and weft once each, confirm the readings are within your shop’s acceptable band, and log the result. Doing this with any tension meter for screen printing takes under ten minutes and prevents many common print issues related to registration and inconsistent ink laydown. Make it part of your start-of-day checklist and you’ll see fewer frantic problem-solving sessions later in the day.
Real-world ROI — how meters pay back in fewer re-runs
A tension meter for screen printing often pays for itself in the first few weeks by reducing setup time and rejects. When tension targets are known and verified, exposure, registration and ink deposit become predictable. Shops that standardize on a tension-check program report measurable reductions in first-pass rejects and lower labor spent on re-inking and screen adjustments. It’s a small capital cost with outsized operational benefit.
Final recommendation — select, standardize, and enforce
Pick a meter that matches your workflow: rugged mechanical meters for heavy-use floors, digital meters if you need logging and traceability. Buy from suppliers who include calibration and documentation. Then standardize your target tensions per mesh and train operators on the simple measurement routine above. When a tension meter for screen printing becomes part of your process control, prints stabilize, training becomes easier, and your shop runs with fewer surprises.
Tension Meter
Pre:Why Your Shop Needs a Screen Mesh Tension Meter – Accuracy, Consistency, Value
Next:Why buying the right tensiometer for sale changes your quality control game


Tags:
 WhatsApp