How to Use Tension Meter: A Practical Buying Guide and Step-by-Step Workflow for Better Prints and Fewer Surprises
Knowing how to use tension meter is not an optional skill for modern production—it’s a core control point. With a clear routine, a suitable meter, and a habit of logging, you’ll convert uncertainty into confidence. Whether your business prints shirts, ass
If you make products that depend on controlled tension—screen printing mesh, conveyor belts, timing belts, bicycle spokes, or SMT stencils—knowing how to use tension meter properly is one of the simplest steps that pays off fast. A reliable tension check gives you predictable results, faster setups, and fewer surprises on the press or the production line. This article explains exactly how to use tension meter in real shops, what to look for when you buy one, and how using it the right way becomes a competitive advantage.
Why everyone who cares about quality asks “how to use tension meter”
Precision starts with measurement. Guessing whether a screen “feels tight enough” or a belt “sounds right” leaves too much to chance. A tension meter gives you a number you can reproduce, document, and act upon. That number removes subjectivity, so every operator—no matter experience level—can match your established targets.
Proper use of a tension meter reduces common production problems: ghosting and blurry prints in screen printing, slippage or premature wear in belt drives, irregular aperture performance in SMT stencil printing. When you understand how to use tension meter, these problems stop being mysteries and become fixable variables.
Which tension meter should you buy (short buying primer)
Before we cover the how-to, a brief word about selection—because the technique depends on the tool:
-
Mechanical vs. digital: Mechanical meters are simple, robust and don’t need batteries. Digital models often provide finer resolution, easier reading, and sometimes data export. Choose what fits your workflow.
-
Range and resolution: Match the meter’s measurement range to your application. Screen mesh is commonly measured in N/cm; belts and cables use N or different units. Don’t buy a meter that barely covers your range.
-
Calibration support: For process control or audits you may want a meter that ships with a calibration certificate or an option for traceable calibration.
-
Durability and ergonomics: Production meters should stand up to handling, solvents, and quick shop use. A protective case and easy-to-read face help adoption.
Investing in the right meter from the start makes learning how to use tension meter faster and less frustrating.
Practical step-by-step: how to use tension meter on a screen (the most common shop scenario)
Below is a field-tested routine many printrooms use. The same principles apply to other contexts—measure center and multiple points, be repeatable, and log results.
-
Prepare the screen
Ensure the mesh is clean and dry. If you’ve just stretched or cleaned a screen, let it settle for the recommended time before measuring. -
Zero check
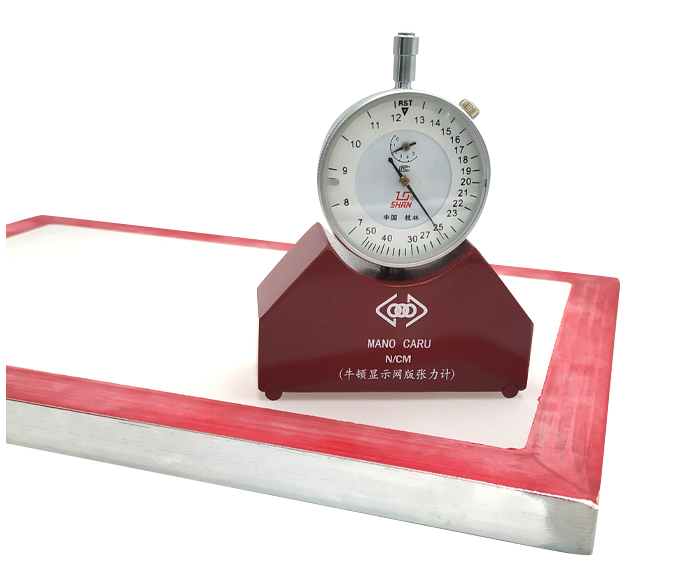
Most meters benefit from a quick zero or functional check. Place the instrument on a flat calibration surface (many kits include a small glass) and confirm the pointer or display behaves as expected. This simple check starts every measurement from a known baseline. -
Position the meter
Place the meter in the middle third of the print area—don’t sit it right on the frame edge. For larger frames, choose several sample points: center, and spots near the four quadrants. -
Take the reading
Gently contact the mesh and let the instrument settle. Some meters respond with a tap to “wake” the movement; consult your meter’s quick guide for the preferred technique. Read and note the value in N/cm (or the unit your meter uses). -
Rotate and repeat
Measure both directions—warp and weft (or along and across the frame). True consistency means both axes fall inside your target band. -
Compare to target
Most shops define a target band (for example, 20–30 N/cm for a particular mesh). If readings fall outside that band, adjust your stretcher and re-measure until values match. -
Log and act
Record the screen ID, date, operator and values. If tension drifts over time, the log helps spot recurring problems (frame stretch, mesh fatigue, or clamping inconsistency).
Follow this routine and you’ll see dramatic reductions in troubleshooting time. Once teams learn how to use tension meter consistently, it becomes a quick pre-press ritual—no drama, just better prints.
How to use tension meter on belts, cables, or spokes (quick adaptation)
The same mindset applies: measure from a defined place, use the correct attachment or head for your meter, and reference a documented target.
-
Belt tension: Use the recommended span and measuring point for your drive. Many belt meters require a plucked-sound or deflection method supplemented by the meter readout. Keep the measurement repeatable—same span, same pluck force.
-
Cables and wires: Use the meter designed for cable applications and read against the manufacturer’s target tension.
-
Bike spokes: A spoke-tension meter measures relative tension; tune wheels to matched readings across spokes for true wheel balance.
No matter the object, the core lesson is identical: define where to measure, check often, and log. That’s the practical side of “how to use tension meter.”
Common mistakes people make when learning how to use tension meter—and how to avoid them
-
Measuring at the frame edge — readings there are not representative; always sample the mesh area.
-
Skipping zero/functional checks — a quick zero prevents false confidence.
-
Inconsistent technique — different placement or pressure yields different numbers. Standardize who measures how.
-
Ignoring calibration — meters drift; schedule periodic calibration by a qualified service when traceability matters.
-
Failing to log — without records, you can’t see drift or link tension to print outcomes.
Avoid these traps and you’ll get the most out of any meter.
The business case: why mastering how to use tension meter improves the bottom line
This isn’t just technical nitpicking. Objective tension control reduces rework, saves emulsion or adhesive, shortens setup time and cuts scrap. When a shop converted from “feel and listen” to documented tension practice, they reported fewer exposure retries, fewer misregistered multi-color runs, and faster first-part success rates. Those gains compound—and they’re dependable because measurement replaces guesswork.
Making adoption easy: training, SOPs and one-page checklists
To make your investment pay off:
-
Create a one-page SOP: where to measure, acceptable ranges, zero-check steps and corrective actions.
-
Keep the meter next to your stretcher or setup bay. Convenience encourages use.
-
Run a short training drill with new staff: measure the same 3 screens and compare logs—consistency is the goal.
-
Schedule simple audits: monthly review of logs to catch drift or operator variance.
This is how teams go from “we have a meter” to “we trust the numbers.”
Final words — start small, measure often, gain control
Knowing how to use tension meter is not an optional skill for modern production—it’s a core control point. With a clear routine, a suitable meter, and a habit of logging, you’ll convert uncertainty into confidence. Whether your business prints shirts, assembles electronics, or maintains belt drives, consistent tension measurement is one of the most cost-effective ways to raise quality and reduce surprises.
Tags: 0.1 micron filter bag 0.5 micron filter bag 1 micron filter bag 50 micron filter bag 25 micron filter bag 10 micron filter bag 1000 micron filter bag 5 micron filter bag micron filter bag micron filter bags 25 micron filter bags 100 micron filter bag 180 micron filter bag 250 micron filter bag 200 micron filter bag 200 micron filter bags 100 micron filter bags 1 micron filter bags micron filter bags near me 05 micron filter bag 30 micron filter bag 150 micron filter bag 10 micron filter bags 200 micron filter bag wholesale 0.1 micron filter bag wholesale 500 micron filter bag 400 micron filter bag 50 micron filter bag wholesale 400 micron filter bag wholesale 20 micron filter bag 0.1 micron filter bag factory in china 500 micron filter bag factory in china 20 micron filter bag wholesale 5 micron filter bag wholesale 250 micron filter bag factory in china 150 micron filter bag wholesale in china micron filter bag wholesale in china 190 micron filter bag 400 micron filter bag factory in china
Pre:Newman Screen Tension Meter: The Durable, Accurate Choice for Consistent Prints
Tags:
