Screen Tension Meter: Measure Once, Print Perfectly
A screen tension meter does one job—and it does it brilliantly: it gives you a reliable number that turns guesswork into control. That single change—moving from subjective feel to objective measurement—transforms the printroom. It shortens make-ready, imp
A proper screen tension meter is the single most important instrument for any printroom that cares about repeatability. When tension is consistent, everything downstream—registration, halftones, ink deposit and stroke-to-stroke consistency—becomes predictable. When tension drifts, problems multiply: misregistration, soft edges, wasted ink, and extra setup time. This article explains why a screen tension meter matters, how to choose one, how to integrate it into daily practice, and how that small investment returns measurable gains.
Why tension is not a feeling
Experienced printers often develop a "feel" for tension, but feel is inconsistent. Mesh, frame, and environmental changes make the same person’s judgement vary from shift to shift. A screen tension meter replaces subjectivity with a number. With that number you can:
-
Set and document target bands for each mesh and job type.
-
Compare tension across frames and across operators.
-
Track drift over time and detect problems before they hit production.
Those are not abstract advantages—measurable tension control lowers scrap rates and reduces the time needed to get a first good print.
What good measurement looks like
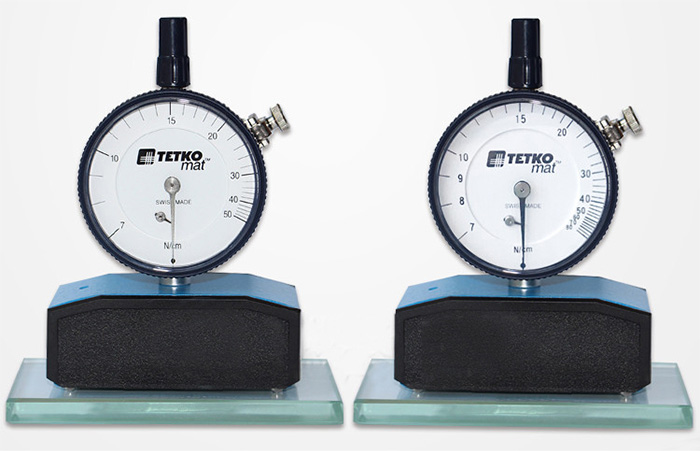
A quality screen tension meter gives clear, repeatable readings in Newtons per centimeter (N/cm) or in an industry-accepted display. Good meters cover useful ranges (for many textile and stencil applications that means something like 7–130 N/cm or configurable bands) and offer resolution fine enough to distinguish meaningful differences. On the production floor, repeatability beats theoretical precision: a meter that reads the same when you measure the same spot is worth more than a fragile instrument with higher spec numbers that wanders.
Choosing the right meter for your shop
Not all meters fit every shop. When evaluating options, weigh these practical considerations:
-
Range & resolution: Match the meter to the mesh or material you use most. If you stretch both fine and coarse meshes, get a meter with a broad usable range.
-
Durability: Shop meters should survive quick handling, occasional knocks, and the occasional spill. Metal housings and protective cases make adoption easier.
-
Ease of use: Large, legible dials or clear digital readouts reduce operator error. Mechanical meters are simple and battery-free; digital meters can offer extra features like data logging.
-
Calibration & serviceability: If your quality system requires traceability, choose a meter that can be delivered with or returned for calibration certificates.
-
Cost vs. value: A mid-range meter often yields the best payoff for most shops—less initial outlay than lab instruments but far more reliable than cheap uncalibrated gadgets.
A thoughtful purchase aligns meter capability with the practical needs of your workflow.
How to use a screen tension meter — a practical routine
Adopting the meter into your daily routine is straightforward. Here’s a field-proven workflow that leads to consistent results:
-
Quick zero check before starting work: Place the meter on a clean calibration glass or flat surface (many meters include a small glass). Confirm the instrument reads zero and that the indicator moves smoothly. A quick check avoids false confidence.
-
Measure in the correct spot: Place the meter in the center third of the printable area—away from the frame edge. For wide frames, sample multiple points (center and at least two edge spots) to detect local unevenness.
-
Measure both axes: Rotate the screen 90 degrees to measure both warp and weft. Many problems occur when the two axes differ significantly.
-
Record the values: Log date, screen ID, operator, and readings. A simple log quickly reveals drift or recurring weak spots on a frame.
-
Adjust and re-check: If a reading is out of your target band, re-stretch or adjust clamps and test again. Aim for a consistent band rather than one single number; a tolerance window gives you room to operate while keeping tight control.
Once the routine is habitual, a tension check becomes as normal as cleaning squeegees.
Common mistakes and how to avoid them
-
Measuring at the frame edge: The frame distorts mesh locally; always sample the mesh area you print through.
-
Skipping the zero check: Calibration glass or zeroing avoids false readings from a bumped meter.
-
Inconsistent placement or pressure: Teach one consistent technique and document it. Repeatability matters more than anyone’s "touch".
-
Ignoring instrument maintenance: Dirt, grit, or dried emulsion can affect readings—clean your meter and protect it when not in use.
-
Treating a single reading as gospel: Use multiple samples and trend data before changing process parameters.
Addressing these simple pitfalls makes the meter actionable rather than confusing.
Integrating the meter into quality systems
For shops aiming to scale, the screen tension meter is a quality control lever. Practical steps include:
-
Define target bands for each mesh/frame combination and put them into job books or digital job tickets.
-
Require pre-run checks: a brief tension log entry before first shot saves rework.
-
Run weekly drift checks on a small set of in-use frames to detect slow changes.
-
Include meter checks in training so new operators use the tool properly from day one.
With these controls in place, setup time shrinks and first-part yields climb.
Real benefits you can quantify
The meter delivers immediate operational wins:
-
Fewer exposure re-runs: Even emulsion layers respond more predictably when mesh tension is consistent.
-
Reduced misregistration: Consistent mesh behavior under squeegee pressure keeps print layers aligned.
-
Less waste: When tension is in spec, prints are more consistent and fewer screens are discarded due to fatigue or localized failure.
-
Faster setup: Operators reach running conditions sooner because a documented tension target removes the biggest source of variance.
Those gains compound. Over months, they show up as happier customers, more first-article approvals, and less frantic troubleshooting.
Installation and training — make it simple
Introduce the meter with a short plan:
-
One-page SOP: Where to measure, zero-check steps, acceptable band, and corrective actions.
-
Five-minute demo for new staff: hands-on practice with the meter and log entry.
-
Quick audits: manager spot-checks once a week for the first month to ensure consistent use.
Simple, repeated steps beat complex procedures every time.
When a higher-end meter makes sense
If you run high-mix, fine-pitch jobs, or have tight process control needs, consider a meter that offers higher resolution, calibration certificates, or data logging. Those features support traceability and in-depth troubleshooting. For many shops, though, a well-built mid-range meter delivers most of the operational upside at a reasonable cost.
Final thought
A screen tension meter does one job—and it does it brilliantly: it gives you a reliable number that turns guesswork into control. That single change—moving from subjective feel to objective measurement—transforms the printroom. It shortens make-ready, improves first-pass yield, and turns a recurring headache into a simple, traceable check.
Buy a meter that fits your work, teach your team how to use it, and make tension measurement part of your pre-run ritual. Measure once, and print perfectly every time.

Screen Tension Meter
Next:Screen Printing Tension Meter: The Tool That Turns Guesswork into Consistent Prints


Tags:
 WhatsApp